Saturday, September 27, 2014

DIY: Getting Rid of Hard Water Spots


Alrighty, well Ace and I just bought a new house a few months ago, and we have been working hard to fix up some of the areas that we don't like. The house was overall in good shape, and has great bones, but it did need some cosmetic updates in a few areas. We've done a lot of painting, and some cleaning, but really that's all it has needed, nothing too major, which is great. It's really starting to come around and feel like our home.

The worst room BY FAR, in terms of appearance and cleanliness, has been the master bathroom. I don't know if the people who lived in there previous just didn't care about it as much as the other rooms, but it was definitely a little neglected compared to the rest of the house. The kitchen an other bath had been recently remodeled, but they didn't really touch the master bath. One of the worst parts of the master bath is the shower. We live in an area with notoriously hard water, and there was a RIDICULOUS amount of water build up on the shower. We knew it looked like that before we purchased the house, but figured it would be an easy fix. Yeah... nope. 

Here are some of the "before" pictures that I took a few days ago. Mind you, this is AFTER we had tried CLR, full strength Zep.... twice, Bleach, Bleach Gel, Scrubbing Bubbles, Soft Scrub, Lysol Bathroom Cleaner, Clorox Toilet Bowl Cleaner, Windex, and pretty much every other product on the market that says it will remove soap scum and/or water build-up. They didn't put a dent in it. And truthfully I'm a little embarrassed by these pictures, but here they are:


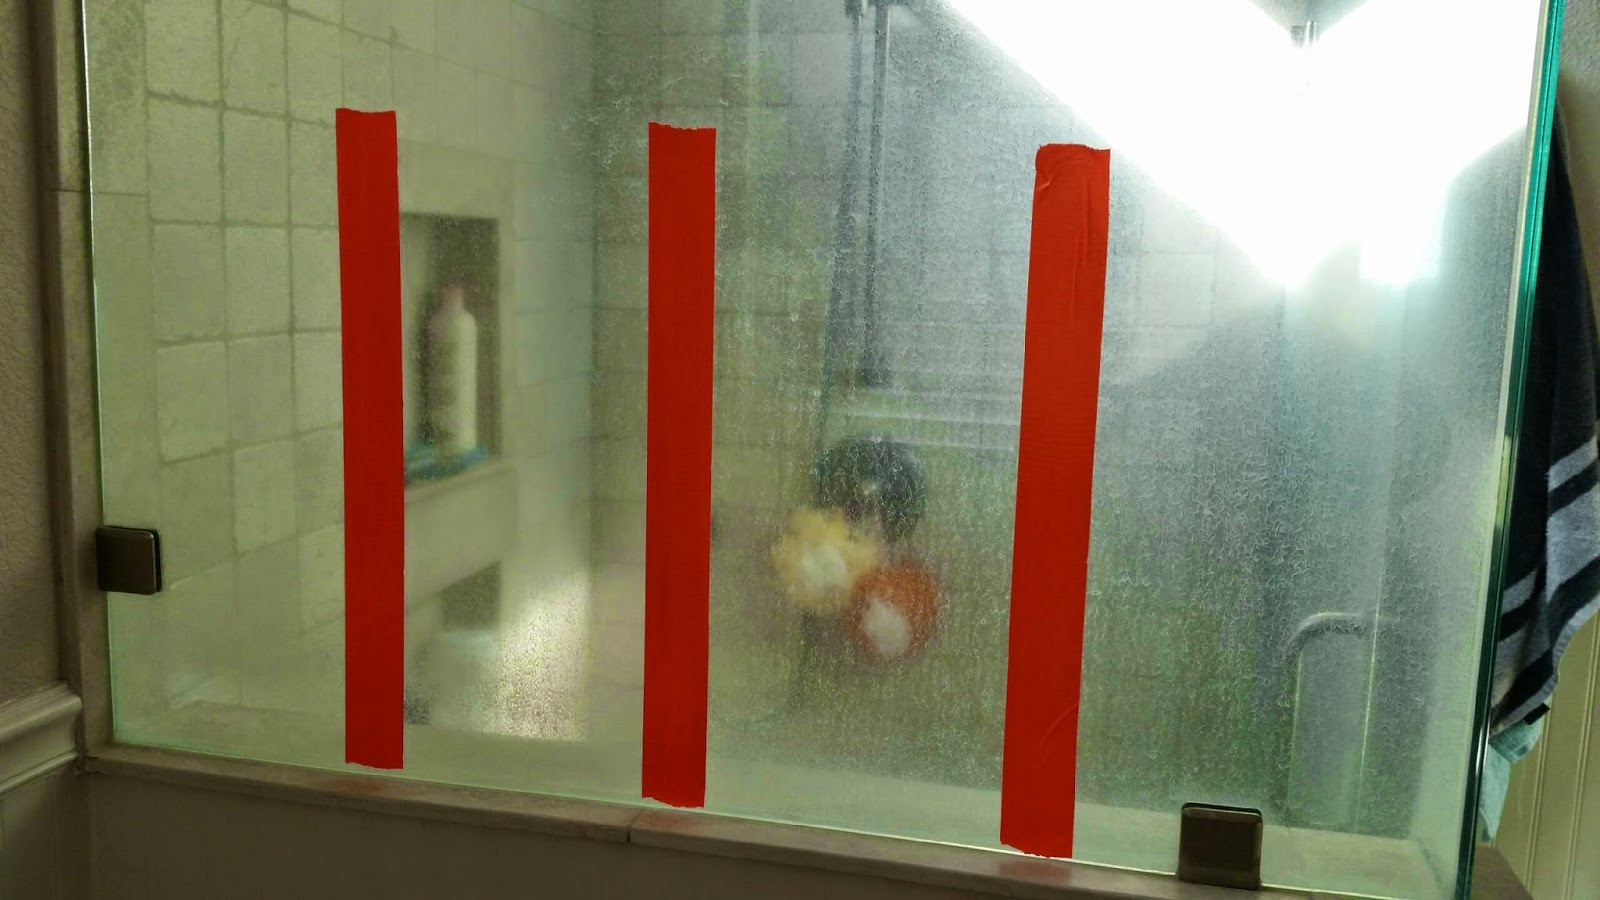
So I decided, after a discussion with some girlfriends, that I would do a little experiment based on their suggestions and some suggestions that I had read on other cleaning forums and blogs. I divided the small glass part of my shower into four sections with some lovely orange duct tape, so that I could use 1 of the 4 methods in each section, and see how it did compared to the others. (Please excuse the bright light at the top of the pic, I have these three small windows in my bathroom that I have yet to figure out how to cover up!) 


Here's what I used: 


In the first section, the one on the far left, I used just straight lemon juice. I cut the lemon in half and rubbed the cut side on the glass. I also squeezed some of lemon juice from the other half on a green scrubby pad, and really tried to work it into the glass. 

In the second section, the second from the left, I used a Mr. Clean Magic Eraser. I know that these things work great on lots of stuff (like taking crayon out of plastic toys and off of painted walls), and someone suggested that it could help get into the little crevices of the glass and get the water stains out. I wet the Magic Eraser and rubbed it all over the section of glass. 

In the third section, second from the right, I used straight white vinegar. It was suggested that I used some sort of vinegar, with apple cider vinegar being the preferred, because the acidic vinegar could break down the stains. I didn't have any apple cider vinegar, so I decided to go with straight white vinegar. I poured some directly on the piece of glass, and I also poured some on a green scrubby to help it break down the stains on the glass. 

On the last section, the far right, I used powdered Bar Keepers Friend. I always have this stuff on hand, because I have stainless steal cookware, and nothing works better to keep it shiny and clean. I shook some of the powder on to a dampened greens scrubby, and rubbed it on the glass. I had to use a little bit of elbow grease with this one, because it didn't want to slide as "smoothly" as the liquid cleaners. It had made somewhat of a paste with the powder and water. 

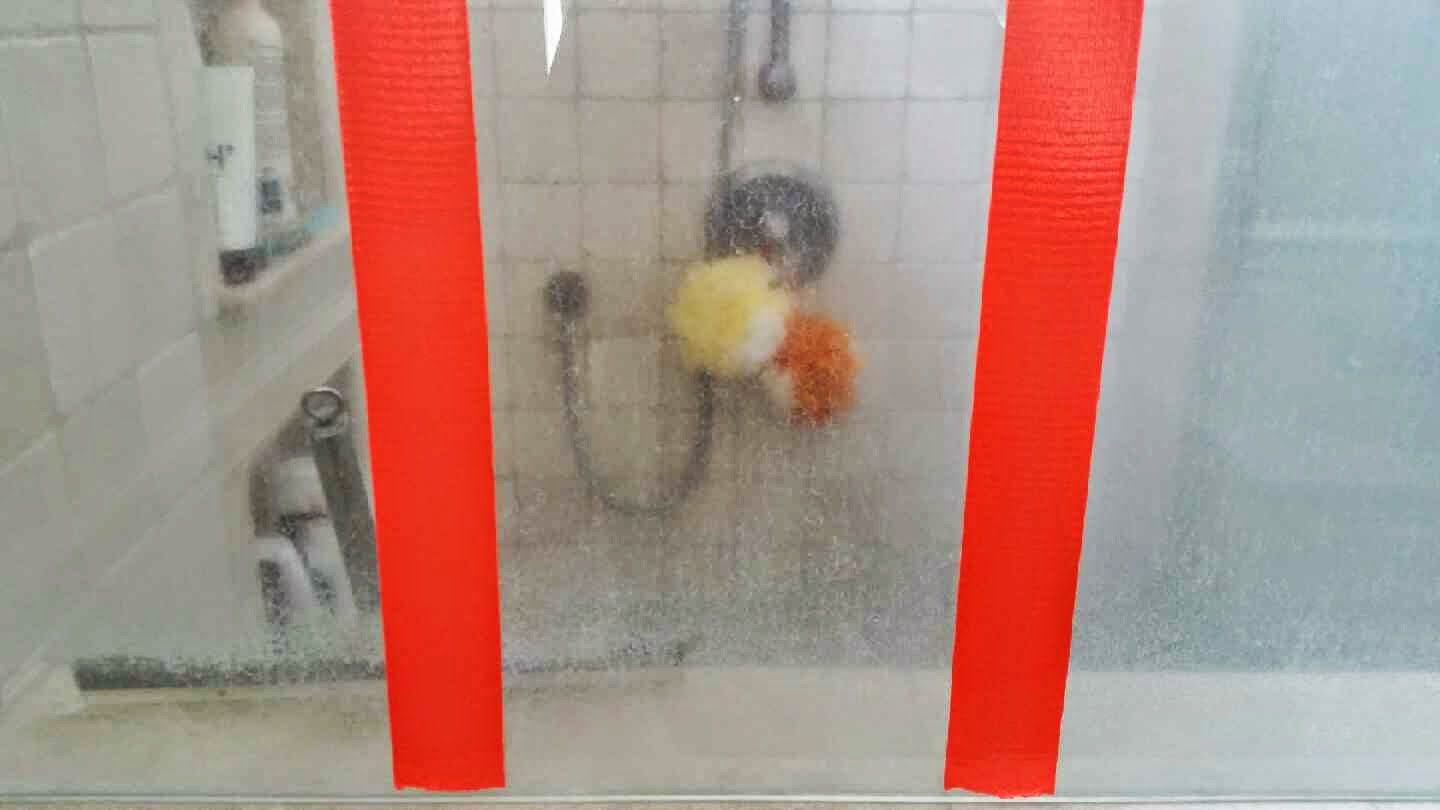
The results were ASTOUNDING to me, to say the least. My money was on the vinegar or the lemon juice, but boy was I wrong. The Mr. Clean Magic Eraser, the lemon juice, and the vinegar didn't even touch the hard water stains. It literally looked like I hadn't done anything to those sections. Here are the after pics of those sections. No change, and still super cloudy looking. 


But the side with the Bar Keeper's Friend?! It was perfectly clear. There were some spots that were still a little cloudy, I had clearly not scrubbed those areas as well, but the majority of the glass in that areas was perfectly clear. Like it had never had a water spot on it in the first place. 


Because it worked so wonderfully, I went out and bought an extra can of it, and went to town on my shower. It took a LOT of elbow grease, and a truthfully a LOT of time. I think our shower was worst than most though, and I was just happy to find something that worked, even if it required a lot of scrubbing. Total it took be probably about 3 hours worth of scrubbing to get it all clear, but totally worth it. I didn't do it all at one, one section here, another section there, usually after the girls would go to bed or while Rubles was napping. Ace couldn't believe it was even the same shower. I'm so happy to finally have this task out of the way. I feel like my master bathroom is already so much better, and will be even better in a few weeks when I get to paint it.  Here's a picture of what it looks like all completed:


Pretty freaking amazing right??!? Now that it is clean, I finally get to work on the rest of the bathroom. I'm thinking slate blue to pair with the tan/cream colors already on the countertops and shower tile. I might paint the vanity black as well, I'm still meandering my way through Pinterest for some more ideas.

What is the color scheme in your bathroom? Have any suggestion for what wall color would pair nicely with my shower?  Give me some inspiration people! 


Friday, September 26, 2014

Triple F: Food Friday, Failure....

Okay, so I was super stoked to post a couple of new fall-based recipes, but I'm sad to say that they were just not good enough to post here, yet. I'm still working on them, and my goal is to get them up in the next couple of day, so that you can try them too. I would be bummed if you tried them as they are now, because they are just not in the tastiest place right now.... Whomp Whomp. But I'm still working on them!

Next weekend is my town's Giant Pumpkin Festival, where you can enter original recipes using Pumpkin as the main ingredient. They have two categories, a savory and sweet category, and I have been working on entries for each of them (you can enter one recipe per category, but that's it). This is the first recipe contest that I have ever attempted to enter, and so far I'm not having any luck and feeling a little discouraged.

Here were my ideas that failed, and some other ideas for what to make, that I'm going to try in the next couple of days.

Sweet Category: 

I was trying a new recipe for granola to make a sort-of-trifle recipe with Pumpkin granola and a Pumpkin custard, with a praline layer in there too (for good measure). The granola wouldn't get crunchy, and just stayed this soggy mess. I'm still working on it though! I think I need to cook it at a lower temp, for a longer amount of time and lessen the amount of pumpkin puree that I used. My pumpkin custard wasn't nearly pumpkin-y enough, so I'm still plugging away with that one as well. I just tasted mostly like vanilla, with a  little bit of cinnamon, cloves and nutmeg in it.

The other idea that I had in the sweet category was to make a pumpkin Snicker doodle cookie, and some pumpkin ice cream, in my ice cream maker, and then make a homemade pumpkin ice cream sandwich. I think I might like this idea better, but not sure how I'm going to keep the sandwiches cold enough before turn in time. Maybe take the ice cream with me, and then put them together when I get there?

Savory Category: 

I tried to make a pumpkin meatloaf. There, I said it. It was terrible. It tasted like I scooped pumpkin pie on top of a hamburger. Not what I was going for. I was really hoping that the moistness of the pumpkin puree would help the meatloaf to stay nice and most, but the two of them just didn't pair very well. Truthfully, I'm having a harder time in the savory category coming up with other ideas. i thought about doing a pumpkin soup, or a pumpkin ravioli, but I think those are things that a lot of people are going to be doing... I'm trying to think outside the box, but not TOO outside of the box... where pumpkin meatloaf lives. (Ace is still laughing about how badly this turned out)

I'll keep you posted on some new ideas, and I apologize for not having a new recipe this week, but I don't think you would have wanted them anyway! I am hoping that next Food Friday will have a few pumpkin recipes just in time for October!

Friday, September 19, 2014

FF: No-Cook Refrigerator Oatmeal Jars

So these are ALL over Pinterest, if you haven't seen them yet, I'd be surprised. I was looking for a way to make some quick breakfasts for myself and DH, so I decided to try them a couple of weeks ago. They are cold oatmeal breakfasts in a jar, but they don't really taste like oatmeal. Because you mix them with Greek yogurt and some other ingredients, and you eat them cold, it takes like sweet, thick, rich yogurt treat... not that much like oatmeal. But nevertheless they are DELICIOUS and something you should try.

These are seriously absurdly easy, and SUPER tasty, not to mention really good for you! Ace really loved them, even texted me part way through the day one day the first week I made them, just to tell me how great they were, and that is saying something. He doesn't typically rant and rave about food, and he's brought these up at least a half dozen times that week, saying how much he liked them, and a few times since. They were an instant hit around here. They last for 2-4 days in the fridge, depending on the ingredients you add in, so they are great for make ahead meals-on-the-run. He takes them to work with him in the morning, and then eats them as a great mid-day snack.

There is a basic recipe, and then you have to decide what you want to add in, and there are TONS of options. I'm going to post a few of my favorites below, so that you can try some of them. I also really encourage you to try your own combinations and find ones that you really love. We've had our fair share of "misses" (mocha flavored and banana nut were the least successful), but the ones below are the flavors we liked the best.


Here's the basic ingredients you need:
  • 1/4 Cup of Rolled Oats: don't get quick cooking oats or steal cut, they won't work the way you need them to, I buy the Organic Rolled Oats from the bulk bins at Sprouts, but you can find rolled oats and any grocery story

  • 1/4 Cup of Greek Yogurt: I like Fage, but really any brand will work. I get loads of coupons for Fage, so that's typically what we get. 

  • 1 1/2 Tsp of Chia Seeds: these help to thicken the mixture, and they are SO good for you. If you haven't read up on the benefits of chia seeds, do it. They are little amazing wonder-seeds of healthiness. I buy mine in bulk at Sprouts as well, but most larger grocery story chains will also carry them pre-packaged, and typically in the aisle with the nuts. 

  • 1/3 Cup of Milk: I used skim milk, but almond or soy milk would be great for this as well

  • 1 Tbsp of Some Sweetener: There are tons of options for this, but go for something natural and healthy. You can use Agave, Pure Maple Syrup, Honey or Preserves as a great option for this. 

  • 1/4 Cup of Some Fruit: Choose something that pairs well with the sweetener you have selected, or a flavor combination that you love. Some fruits work better than others, for example, bananas aren't that great, because they get brown and mushy pretty quickly. But any sort of berry is a great choice. Also note that the type of fruit you choose will determine how long these will stay good in the fridge. Fruits that need lots of cutting up or dicing (like peaches) will go "bad" faster and should be used in 1-2 days. "Whole" fruits like whole berries will stay much longer, and will last 3-4 days. 
  • Mason Jars: I used the pint sized for these, but truthfully any container with a lid that can hold about a cup of stuff would work just fine. 

Below are the different recipes for the different flavor combinations that we like. Please note that the initial four ingredients are the same for each, but the last ingredients will differ depending on the flavor.

Blueberry:

  • 1/4 Cup of Rolled Oats
  • 1/4 Cup of Greek Yogurt
  • 1 1/2 Tsp of Chia Seeds
  • 1/3 Cup of Milk 
  • 1 Tbsp of Maple Syrup
  • 1/4 Cup of Whole Blueberries 


Apple: 

  • 1/4 Cup of Rolled Oats
  • 1/4 Cup of Greek Yogurt
  • 1 1/2 Tsp of Chia Seeds
  • 1/3 Cup of Milk 
  • 1 Tbsp of Honey
  • 1/2 Tsp of Cinnamon 
  • 1/4 Tsp of Pure Vanilla Extract
  • 1/4 Cup of Applesauce (unsweetened) 


Blackberry: 

  • 1/4 Cup of Rolled Oats
  • 1/4 Cup of Greek Yogurt
  • 1 1/2 Tsp of Chia Seeds
  • 1/3 Cup of Milk 
  • 1 Tbsp of Seedless Blackberry Preserves (Boysenberry would be great also!) 
  • 1/4 Tsp of Pure Vanilla Extract
  • 1/4 Cup of Whole Blackberries (you can cut these in half if they are too big) 


Raspberry: 

  • 1/4 Cup of Rolled Oats
  • 1/4 Cup of Greek Yogurt
  • 1 1/2 Tsp of Chia Seeds
  • 1/3 Cup of Milk 
  • 1 Tbsp of Agave 
  • 1/4 Tsp of Pure Vanilla Extract
  • 1/4 Cup of Whole Raspberries 


How To Assemble Each Jar: 

For each of the recipes above, the process is the same for each one, you are just using separate ingredients. I like to make these in large batches, preferably of just 1 or 2 flavors, so that I'm doing the same steps at the same time. If you try to make too many flavors at once, its not always easy to remember which jar is which. 

Step 1: Add the oatmeal to the jars.


Step 2: Add the chia seeds to the jars.


Step 3: Add in the Greek yogurt to the jars. 

Step 4: Add the milk to the jars. 

Step 5: Add in the sweeteners that you are using (honey, agave, maple syrup, preserves, etc.) 

Step 6: Add in any additional flavorings (vanilla extract, almond, extract) This is what the jars will look like with everything in them:


Step 7: Put the lids on the jar, and SHAKE SHAKE SHAKE the jars! Do this until everything is well combined, which is usually around 10 seconds or so. This is what they will look like after you are done shaking them


Step 8: Remove the lid, and stir in whatever fruit you are using with a spoon. You don't want to add in the fruit before you shake the jar, because it crushes the fruit.


Step 9: Replace the lid on top of the jar, and place in the refrigerator. Let them sit at least overnight (or about 10 hours), and enjoy them cold the next morning or afternoon or evening or late at night....

I just made these jars, so they aren't quite ready to show the finished product, but I will add some more pictures later of what they look like after they are finished! So yummy! 


Friday, September 12, 2014

My First, Food Friday!

So I was thinking about how I was going to start sharing some of my recipes with you guys, and I'm officially launching.....

FOOD FRIDAYS!

I have so many recipes saved up that I would love to show everyone. Plus I have been cooking so many more totally new recipes lately, part of that is because of my 101 in 1001 List, and partly because I felt like I was getting in a food rut, cooking the same 5 meals every week. I can't promise that I will post every week, or that every recipe will be this mind blowing, epiphany-creating creation, but I'm hoping that you'll like them and use them at home.

Are you ready for our first go at this?..... Our very first FOOD FRIDAY recipe is going to be.... Dun Dun Dun!

PICKLES 

Now you might be thinking, "Please lady, I buy my jar of Vlasic's a the store every month, and I'm perfectly happy doing that." And that's fine! Eat those Vlasic's up, they're delicious, I buy them too. But you know what else is delicious? Pickled beets, and pickled cauliflower, and pickled garlic, and pickled EVERYTHING, or at least I think so. A few months ago, I had never made them at all, but now I make them pretty frequently and add them into so many things.

One batch I made recently, I made three different types of pickled veggies. I did garlic, onions and beets, three things that are great on their own and great pickled too. I didn't combine them (though that's not a bad idea!), instead I kept them in individual jars. I want to be clear though, on the type of pickles I'm talking about making. Pickling is a natural way to preserve stuff, but it won't last forever. You can get a couple of weeks out of each jar that you make, as long as it stays in the fridge. If you want them to last much, much, much longer, you can go ahead and can your pickles. While canning is a wonderful idea, I don't have the know-how, time or energy to do it.... so I make quick, refrigerator pickles that stay just lovely for about 3 weeks.

Anyway, let's get to the recipes. I'm going to give you the basic recipe that I used, which can be used to pickle pretty much anything. In my pictures I pickled garlic, onions and beets, but use what you like to eat.


What you need: 

1. Air Tight Jars (I used these jars from IKEA because they were perfect sized and cheap!)


2. Small Pot

3. 2 cups of vinegar (you can use pretty much any kind, except balsamic... I used plain ol' white vinegar)

4. 2 tablespoons of white sugar

5. 3 tablespoons of whole spices (again you can use whatever you like, but make sure they are in their whole form, not ground or dried. You want three tablespoons of spices total, but the combination is up to you. I used a tablespoon of whole peppercorns, a tablespoon of coriander seeds and a tablespoon of mustard seeds. But you could add fresh dill, cloves, anise, really anything you like the flavor of. In my pickled garlic jars, I added two habanero peppers to make them a bit spicier)

6. About 1 - 1 1/2 cups of whatever food you are pickling (for this batch I got garlic cloves and peeled them all myself, I also used 3 beets that were on the smaller side for the beet jar, and I used these awesome red pearl onions for the pickled onions I was making)

How to do it: 

First you will need to bring a big pot of water to a boil, to sanitize your jars. Get the water to a rolling boil, and then put the jars, their lids (if they aren't attached) and any other jar components in the water. This makes sure that other bacteria isn't added to your pickled food, which would spoil it faster, and they wouldn't last as long. After they have boiled for about 3 minutes or so, take them out and let them dry and cool down on a clean towel.


The next step is to prep whatever you are going to pickle. Because we are doing quick pickles, you have to get the food soft enough to absorb some of the brine, because it won't be sitting in it for months. This typically means that it needs to be par-boiled until it is soft before you put it in the jars. For the beets that I made, I had to boil them the longest of anything, and it took about 25 minutes for them to get soft. You want them to still be pretty firm, but just somewhat softened on the outside. For the garlic that I pickled, I boiled them for about 4 minutes. The onions are thin enough on their own, that they didn't need to be boiled ahead of time, but they do need to be peeled. Peeling the garlic and onions was the worst, most time consuming part of the whole thing! It isn't difficult, just tedious, but it's a necessary evil. Next time I do onions, I'm just going to slice large red onions, so I only have to peel 1 or 2 of them instead of like 50 of them.

I kept the onions whole, because they were so small, same for the garlic. For the beets though, I sliced them up, so that the brine could get in there more easily. "Softer" foods you could leave in bigger pieces, but "harder" foods, should be cut into bite sized pieces.


Once your food is prepped and ready, add it to the jars. Get as much in there as you can. When you pour the liquid over it later, it will fill all of the nooks and crannies around the food that is in there. I wish I would have put some more onions in my onion jar, but I only bought one package of them and I was making these at midnight and didn't want to wait until the next morning for me to go get more.

After you get the stuff in the jars, it is time to add the brine.


In your small pot or saucepan, add in the vinegar, spices and sugar. Bring to a rapid boil, when the sugar is dissolved completely, remove it from the heat. Pour the hot mixture over the food that is prepped and in the jars. Make sure the whole spice pieces get in there as well as the liquid. They help flavor your pickles as they sit.


Once the jar is totally full, seal it up and let it sit. Don't put it in the fridge until it has cooled down to room temperature, because the shock of hot/cold can sometimes cause the glass of the jars to crack.


Now the hard part.... WAITING!You have to wait about a week for them to pickle, but then you can eat all you want. I honestly think I ate a whole jar of beets in about 2 days, they were SO good. We added the pickled garlic to salads, sandwiches, hamburgers, and added the pickled onions to tacos, salads, burgers, and so many other things. They came out delicious and are so easy and inexpensive to make. I can't wait for this fall to try some other things like carrots and cauliflower.


And there you have it! Easy, quick, refrigerator pickles. Let me know how yours come out, I would LOVE to hear about it. What spices did you try? What did you pickle? Give me the details people!

Thursday, September 11, 2014

First Birthday Celebration!

Holy moly, this past week has been a bit nutzo! We've had family staying at our house for the past week, as well as people visiting from out of town to celebrate a big family milestone. Monday, September 8th, was Rubes' first birthday and we had her party this past weekend. I love parties, but they can be a lot of work. That coupled with the busiest work week I've had in a LONG time, made for one tired, sleep-deprived Mama! 

We decided to do a monster-themed party, and I've been Pinning all kinds of cool things to do for decor and food. I love me a good themed party, and we had so much fun getting everything ready. It was a LOT of work, but I really tried to pace myself and do little bits for the few weeks leading up to her birthday. Overall the stuff came out pretty much like I wanted it to, and her party was lovely.


I think the easiest thing that we made were the Monster Rice Krispies Treats. A little melting chocolate in different colors, and some edible candy eyes, and we were set to go!


We also made chocolate dipped pretzel sticks, which we rolled in sparkly and colorful sprinkles, as well as some chocolate dipped Oreos. These were a bit of a pain, because we had to "glue" the sticks in with buttercream frosting, and then some of the chocolate colors were a little light to cover up the dark cookie, but add a few eyes and some icing, and voila! Monsters on a stick!


My niece and my older sister helped out, and made these AMAZING monster goodie bags. They put the faces on regular, solid colored gift bags, and added all kinds of accessories and stuff. I was thrilled with how they turned out. They are both so creative, and every bag looked a little different. 

We put out colored pieces of paper next to the red box (which you can see in the picture below). We asked people to write a note to Rubes and put it in the box. We have sealed the box (along with some pictures from her party) and we will have her open it up at her 18th birthday party. I can't wait to see what people wrote to her! 


We had lots of little ones coming (the oldest was three) so we set up a little set of tables and chairs and I printed some mister images that I found online. We put out cups of crayons next to them, and when they were done coloring them, we hung the pictures on the wall next to the table and made a little monster gallery.


This birthday party for us, was a bigger deal than most first birthday parties are, since at times in this past year we didn't know if Rubes was going to make it to her first birthday. I haven't mentioned it here before, but part of the reason I became more motivated to change how my life was going, was because we got as close as you can get to losing our girl. In October of 2013, when Rubes was just 6 weeks old, she was acting pretty lethargic and sleeping a ton. Then one night she started to vomit a lot, and we took her to the emergency room to make sure that she wasn't getting dehydrated. A VERY long and complicated story short, 12 hours after entering in the emergency room, she was placed on life support because her heart had stopped and she had been given CPR to revive her. 

We didn't know it, but she had an undiagnosed heart defect, and during the 6 weeks she had been alive, although she was eating and seemingly doing well, her body was not getting enough oxygen and her heart was working overtime. Not only did her heart fail that day, but she was in kidney failure, liver failure and her digestive system was shutting down (why she was vomiting so much). Four days later she underwent open heart surgery to fix the issue, many of the hospital staff didn't think she would make it through the surgery, but she did and continued to fight. We stayed at the hospital for 8 weeks total, while they slowly but surely got all of her organ systems back to working order and her relatively healthy. 

Now, 10 months later she is doing so well. She is physically catching up to the kids in her age group, and she is cognitively right at about age level. She is gaining weight, and her heart function looks great. Although she will have to undergo around 4 more surgeries in her lifetime to replace one of the valves in her heart, we will be prepared for those and she will go in as a healthy kid. 

This was without a doubt the most trying, difficult, terrifying experience of my life, and I can truly say that I left the hospital with her as a different person. A more kind, grateful, motivated person. So this birthday was especially important for us. Not only was it a typical big-deal-for-our-kid milestone, but it was one that reminds us of how lucky we are to actually have her here on this day. We were so blessed to have so many family and friends to join us and share in the love as well!

Make sure to check out Scarlett's camping themed 3rd birthday pictures as well for some more fun party ideas!